
典型案例:使用 Target-Action 模式添加 NSTimer
考虑这种场景:进入一个页面后,启动 timer;退出此页面后,timer 也销毁。
看看下面的代码实现有什么问题:
1
2
3
4
5
6
7
8
9
10
11
12
13
14
15
16
17
18
19
20
21
22
23
24
#import "ViewController.h"

@interface ViewController ()
@property (nonatomic, strong) NSTimer *timer;
@end

@implementation ViewController
- (void)viewDidLoad {
    [super viewDidLoad];

    self.timer = [NSTimer timerWithTimeInterval:1 target:self selector:@selector(timerTriggered:) userInfo:nil repeats:YES];
    [[NSRunLoop currentRunLoop] addTimer:self.timer forMode:NSRunLoopCommonModes];
}

- (void)timerTriggered:(NSTimer *)timer {
    NSLog(@"timerTriggered");
}

- (void)dealloc {
    [self.timer invalidate];
    self.timer = nil;
    NSLog(@"%s", __func__);
}
@end
问题描述
我们期望的是,用户退出此 viewController 后,其 dealloc 会被系统调用,并执行我们添加的销毁 timer 的代码。
但是,退出此 ViewController 页面后,NSLog(@"%s", __func__) 不会打印,而 NSLog(@"timerTriggered") 会一直执行。说明 dealloc 方法没有调用。
显而易见,这里存在内存泄漏。
原因分析
timer会保留其目标对象,等到自身“失效”时再释放此对象。调用invalidate方法可令timer失效;执行完相关任务之后,一次性的timer也会失效。开发者若将timer设置成重复执行模式,那么必须自己调用invalidate方法,才能令其停止。1
在上述代码中,viewController 强引用了 timer,timer 又强引用了 target (即 viewController),形成了循环引用:

由于 timer 强引用了 viewController,所以即使从 viewController 页面退出后,其引用计数也大于 0,导致 viewController 的 dealloc 方法不会执行,因此 dealloc 里的 [self.timer invalidate] 也就无法执行了。
接下来讲讲常见的解决方法。
示例 project:https://github.com/BOB-Module/NSTimer-Utils
方法一:在其它地方调用 invalidate 方法
由上述分析可知,由于存在循环引用,所以 dealloc 方法不会执行。我们可以在 viewWillDisappear 等 view 事件里调用 invalidate 销毁 timer,这样就能打破循环引用了。
不太推荐使用此方案,但在某些场景中或许恰好适用。可以根据项目的需求自行决定在哪个事件里销毁 timer。
方法二:使用 iOS 10 添加的新 API(推荐)
在 iOS 10 及以上的项目中,可使用 NSTimer 新增的 block 范式的方法,只要确保 block 内没有循环引用即可:
1
2
3
4
5
6
__weak typeof(self) weakSelf = self;
self.timer = [NSTimer timerWithTimeInterval:1 repeats:YES block:^(NSTimer * _Nonnull timer) {
    __strong typeof(weakSelf) strongSelf = weakSelf;
    NSLog(@"timerTriggered");
    // ...
}];
方法三:使用 dispatch_source 定时器(推荐)
使用 dispatch_source 定时器的案例,可参看 MSWeakTimer。
// TODO:写一篇相关博客,在这里附上链接。
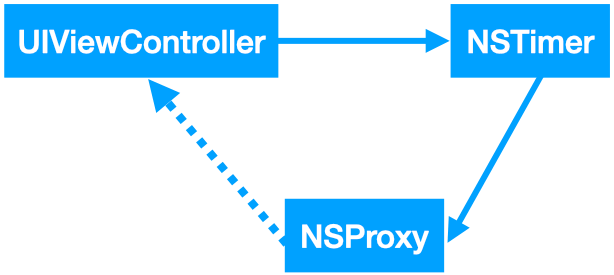
方法四:使用 NSProxy 做中间件(推荐,有创意)
使用 NSProxy 做中间件执行消息转发。要点:
- 把
timer的target设置成proxy; proxy弱引用viewController,并将timer发来的定时任务转发给viewController。
关系图如下(虚线代表弱引用):
先添加 NSProxy 的子类 LBWeakProxy:
1
2
3
4
5
6
7
8
@interface LBWeakProxy : NSProxy

/// 弱引用原 Target(在本例中就是 viewController)
@property (nonatomic, weak) id target;

+ (instancetype)proxyWithTarget:(id)target;

@end
1
2
3
4
5
6
7
8
9
10
11
12
13
14
15
16
17
18
19
20
21
22
23
24
25
26
27
@implementation LBWeakProxy

+ (instancetype)proxyWithTarget:(id)target {
    LBWeakProxy *proxy = [LBWeakProxy alloc];
    proxy.target = target;
    return proxy;
}

- (NSMethodSignature *)methodSignatureForSelector:(SEL)sel {
    if ([self.target respondsToSelector:sel]) {
        NSMethodSignature *signature = [self.target methodSignatureForSelector:sel];
        return signature;
    }
    return [super methodSignatureForSelector:sel];
}

-(void)forwardInvocation:(NSInvocation *)invocation {
    SEL aSelector = invocation.selector;
    if ([self.target respondsToSelector:aSelector]) {
        invocation.target = self.target;
        [invocation invoke];
    } else {
        [super forwardInvocation:invocation];
    }
}

@end
然后,在创建 timer 时,将 timer 的 target 设置为 proxy:
1
2
3
4
// 强引用链: self -> timer -> proxy , 而 proxy 弱引用 self, 不会形成循环引用
LBWeakProxy *proxy = [LBWeakProxy proxyWithTarget:self];
self.timer = [NSTimer timerWithTimeInterval:1 target:proxy selector:@selector(timerTriggered:) userInfo:nil repeats:YES];
[[NSRunLoop currentRunLoop] addTimer:self.timer forMode:NSRunLoopCommonModes];
原理
NSProxy 简介:和 NSObject 类似,是基类。这里利用 NSProxy 的methodSignatureForSelector:方法、forwardInvocation: 方法做了消息转发。
在上述例子中,先通过 proxyWithTarget: 方法创建 LBWeakProxy 的实例 proxy,然后将 timer 的 target 设置为 proxy,在 proxy 内弱引用 viewController、并将消息转发给 viewController。
回到文章开头的案例:退出 viewController 页面时,由于 timer 没有强引用 viewController,所以 viewController 的 dealloc 方法会执行,dealloc 中销毁 timer 的方法也就能正常执行了。
这样,viewController 在释放时,timer 也释放了。
用 NSProxy 做消息转发比 NSObject 高效
也有人使用 NSObject 子类做中间件执行消息转发,但实际上效率没有 NSProxy 高。因为 NSObject 要先执行方法查找,找不到相关方法后,才进入消息转发阶段。
而 NSProxy 如同其名,天生就是做代理的,会直接进入到消息转发阶段。
方法五:添加一个 NSTimer 的分类方法(iOS 10 以下适用)
这个方案来自《Effective Objective-C 2.0》。
如 方法二 所述,在 iOS 10 及以上的项目中,可使用 NSTimer 新增的 block 范式的方法。
在 iOS 10 之前,为了支持这种 block 范式 API,通常的做法是为 NSTimer 添加一个分类方法:
NSTimer+EOCBlocksSupport.h
1
2
3
4
5
6
7
8
9
@interface NSTimer (EOCBlocksSupport)

/// Creates a timer and schedules it on the current run loop in the default mode.
+ (NSTimer *)eoc_scheduledTimerWithTimeInterval:(NSTimeInterval)timeInterval repeats:(BOOL)repeats block:(void (^)(NSTimer *timer))block;

/// 可以稍后给 timer 指定 run loop mode
+ (NSTimer *)eoc_timerWithTimeInterval:(NSTimeInterval)timeInterval repeats:(BOOL)repeats block:(void (^)(NSTimer *timer))block;

@end
NSTimer+EOCBlocksSupport.m
1
2
3
4
5
6
7
8
9
10
11
12
13
14
15
16
17
18
@implementation NSTimer (EOCBlocksSupport)

+ (NSTimer *)eoc_scheduledTimerWithTimeInterval:(NSTimeInterval)timeInterval repeats:(BOOL)repeats block:(void (^)(NSTimer * _Nonnull))block {
    return [self scheduledTimerWithTimeInterval:timeInterval target:self selector:@selector(eoc_blockInvoke:) userInfo:[block copy] repeats:YES];
}

+ (NSTimer *)eoc_timerWithTimeInterval:(NSTimeInterval)timeInterval repeats:(BOOL)repeats block:(void (^)(NSTimer *timer))block {
    return [self timerWithTimeInterval:timeInterval target:self selector:@selector(eoc_blockInvoke:) userInfo:[block copy] repeats:repeats];
}

+ (void)eoc_blockInvoke:(NSTimer *)timer {
    void (^block)(NSTimer *timer) = timer.userInfo;
    if (block) {
        block(timer);
    }
}

@end
在 viewController 中调用上述分类方法(需要注意的是,block 中不要强引用 viewController):
方式一(使用 currentRunLoop 的 default mode):
1
2
3
4
5
__weak typeof(self) weakSelf = self;
self.timer = [NSTimer eoc_scheduledTimerWithTimeInterval:1 repeats:YES block:^(NSTimer * _Nonnull timer) {
    __strong typeof(weakSelf) strongSelf = weakSelf;
    NSLog(@"%@, %@", strongSelf, timer);
}];
方式二(可自行选择 mode):
1
2
3
4
5
6
__weak typeof(self) weakSelf = self;
self.timer = [NSTimer eoc_timerWithTimeInterval:1 repeats:YES block:^(NSTimer * _Nonnull timer) {
    __strong typeof(weakSelf) strongSelf = weakSelf;
    NSLog(@"%@, %@", strongSelf, timer);
}];
[[NSRunLoop currentRunLoop] addTimer:self.timer forMode:NSRunLoopCommonModes];
《Effective Objective-C 2.0》对上述代码的解读:
- 这段代码将
timer所应执行的任务封装成block,在创建timer时,将block作为userInfo参数传进去。 userInfo可以用来存放不透明值(opaque value),只要timer有效,就会一直保留着它。传入参数时要通过copy方法将block拷贝到“堆”上,否则等到稍后要执行它的时候,该block可能已经无效了。timer现在的target是NSTimer类对象,这是个单例,因此timer是否会保留它,其实都无所谓。此处依然有保留环,然而因为类对象(class Object)无需回收,所以不用担心。
小结
NSTimer对象会保留其目标,直到 timer 本身失效为止,调用 invalidate 方法可令 timer 失效;另外,一次性的 timer 在触发完任务之后会自动失效。dispatch_source定时器在大多数场景下可以替代NSTimer。- 用
NSProxy做消息转发可以解决一些循环引用的问题。
相关资料
《Effective Objective-C 2.0》第 52 条:别忘了 NSTimer 会保留其目标对象。 ↩